How to Charge Mobile Phones with Solar Panel
In an era where sustainability meets technology, harnessing solar energy to power our devices has become increasingly practical and accessible.
Whether you’re an outdoor enthusiast, preparing for emergencies or simply looking to reduce your carbon footprint, learning how to charge mobile phone with solar panel opens up a world of energy independence.
Solar charging isn’t just about connecting a panel to your device, it requires understanding voltage regulation, power management and the right components to ensure safe and efficient charging.
This comprehensive guide will walk you through seven proven methods that range from simple plug-and-play solutions to more technical DIY approaches, helping you choose the best option for your specific needs and technical expertise.
How to Charge Mobile Phones with Solar Panel
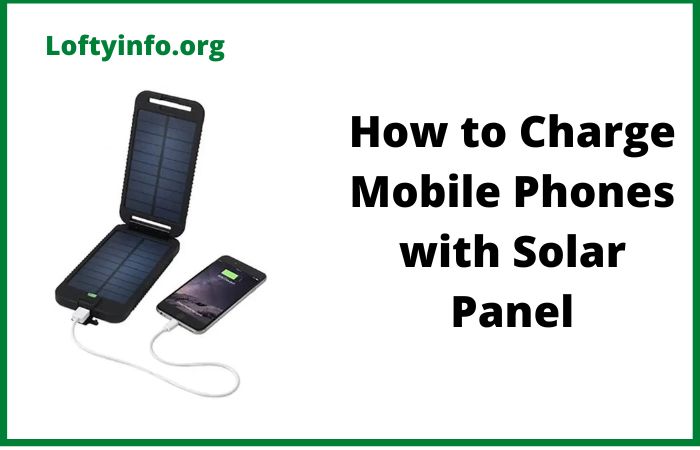
Method 1: Using a Solar Power Bank
The most straightforward approach for solar mobile charging involves a solar power bank, which combines photovoltaic cells with an integrated battery and charging circuits.
These portable devices typically feature solar panels on their exterior surface and USB output ports for device connection.
The built-in battery stores energy collected from sunlight, allowing you to charge your phone even when the sun isn’t shining.
Quality solar power banks include overcharge protection, short-circuit prevention and multiple output ports for charging several devices simultaneously.
When selecting a solar power bank, look for models with at least 10,000mAh capacity and monocrystalline solar panels for better efficiency.
The charging speed depends on panel size and sunlight intensity with most units taking 25-50 hours of direct sunlight to fully charge their internal battery, though they can simultaneously charge from both solar and wall outlets to reduce waiting time.
Method 2: Direct Connection with USB Solar Chargers
USB solar chargers eliminate the middleman battery by converting solar energy directly into usable power for your mobile device.
These compact panels feature integrated voltage regulators and USB ports typically providing 5V output suitable for most smartphones.
The advantage of this method is real-time charging without storing energy in an intermediary battery, making the system lighter and more efficient.
Charging only works during daylight hours and performance fluctuates with changing sunlight conditions.
Look for USB solar chargers with smart charging technology that can adjust output to match your device’s requirements, preventing damage from voltage fluctuations.
Models with foldable designs offer portability while providing sufficient surface area aim for at least 10-15 watts of power output for reasonable charging speeds.
Many quality units include amorphous or monocrystalline panels with the latter offering superior efficiency in bright conditions and the former performing better in partial shade.
Method 3: Buck Converter Configuration
For those with technical inclination, using a buck converter or step-down converter provides precise control when your solar panel outputs higher voltage than your phone requires.
This method is ideal when working with 12V or 18V solar panels that need reduction to the standard 5V USB charging voltage.
A buck converter efficiently reduces voltage while maintaining power output meaning if you’re converting 12V at 1A down to 5V, you’ll get approximately 2A output while accounting for some efficiency loss.
To implement this method, connect your solar panel to the buck converter’s input terminals, adjust the output voltage to exactly 5V using the converter’s potentiometer while measuring with a multimeter, then connect a USB port or charging cable to the output terminals.
Critical considerations include selecting a buck converter rated for at least 3A output current to ensure adequate charging speed, adding a blocking diode between the panel and converter to prevent reverse current at night and incorporating a voltage regulator IC for stable output despite sunlight fluctuations.
This configuration works exceptionally well for fixed installations like camping setups or emergency backup systems where you have a larger solar panel available.
Method 4: Boost Converter Setup
When your solar panel produces insufficient voltage for direct phone charging such as small 3V or 6V panels, a boost converter or step-up converter becomes necessary.
This DC to DC converter increases lower voltages to the required 5V USB standard, making it possible to charge mobile phones with smaller, more portable solar panels.
The trade-off with boost converters is that increasing voltage decreases available current proportionally.
So a 3V panel producing 2A would theoretically provide only about 1.2A at 5V output.
To set up a boost converter system, wire your solar panel to the converter’s input, use a multimeter to adjust the output voltage to precisely 5V and connect your phone’s charging cable to the output.
Select a boost converter module with USB output ports or add a USB breakout board for convenient phone connection.
This method particularly suits backpackers and travelers who need lightweight charging solutions, as smaller panels with lower voltage are significantly lighter than their higher-voltage counterparts.
Adding a small capacitor (1000μF or higher) across the solar panel terminals helps smooth power delivery during momentary shading from passing clouds.
Method 5: Charge Controller Integration
Professional grade solar phone charging employs dedicated solar charge controllers that manage power flow, protect batteries and optimize charging efficiency.
PWM (Pulse Width Modulation) and MPPT (Maximum Power Point Tracking) controllers represent the two main types with MPPT offering superior efficiency by continuously adjusting electrical load to harvest maximum power from your solar panel under varying conditions.
This method involves connecting your solar panel to the charge controller input, attaching a rechargeable battery (typically 12V lead-acid or lithium) to the controller’s battery terminals and connecting your phone charger to the controller’s load output or USB port if equipped.
The charge controller prevents battery overcharging during peak sunlight and over discharging at night significantly extending battery lifespan.
This configuration excels for permanent installations such as off-grid cabins, RVs or boats where reliable mobile device charging is essential regardless of weather conditions.
Many modern charge controllers include built-in USB ports specifically designed for phone charging, eliminating the need for additional converters.
When selecting a charge controller for mobile phone charging applications, a small 10A unit typically suffices for panels up to 100W, providing ample power for multiple device charges daily.
Method 6: Voltage Regulator Circuit
Building a custom voltage regulator circuit using components like the LM7805 IC offers a budget-friendly DIY approach to how to charge mobile phone with solar panel safely.
The LM7805 is a three-terminal positive voltage regulator that outputs a stable 5V regardless of input voltage fluctuations, provided the input remains above 7V.
To construct this circuit, connect your solar panel’s positive terminal to the LM7805’s input pin, ground the middle pin along with the panel’s negative terminal and take the regulated 5V output from the third pin.
Essential additions include a 0.33μF capacitor between input and ground to prevent oscillation, a 0.1μF capacitor between output and ground for improved transient response, and a heat sink attached to the regulator as it dissipates excess power as heat.
This method works best with solar panels rated between 9V and 18V with at least 1A current capacity.
While less efficient than switching regulators (buck/boost converters) due to heat loss, linear regulators like the LM7805 produce exceptionally clean power with minimal electrical noise, making them ideal for sensitive electronics.
Add a Schottky diode in series with the solar panel positive terminal to prevent battery drain or reverse current and consider including a fuse for short-circuit protection.
Method 7: Commercial Solar Charging Kits
For those seeking convenience without compromising capability, commercial solar charging kits provide complete, plug-and-play solutions specifically designed for mobile devices.
These comprehensive packages typically include a properly sized solar panel, all necessary cables, mounting hardware and often a storage battery or power station.
Premium kits feature weather-resistant components, multiple device charging ports and intelligent power management systems that automatically optimize charging based on available sunlight and connected devices.
The significant advantage of commercial kits is their pre-engineered design that ensures component compatibility and safety compliance.
No calculations, soldering or technical expertise required.
Quality kits from reputable manufacturers include built-in protections against overvoltage, overcurrent, overheating and short circuits, providing peace of mind that your expensive smartphone won’t be damaged during charging.
When evaluating commercial options, examine the panel’s wattage (15-25W minimum for practical phone charging), included battery capacity if applicable and customer reviews regarding real-world performance.
Many modern kits also include additional features like LED indicators showing charging status, waterproof construction for outdoor use and compatibility with various device types beyond just mobile phones.
While generally more expensive than DIY approaches, commercial kits save time and reduce the risk of component mismatch or improper connections that could damage your devices.
Choosing the Right Method
Selecting the optimal approach depends on several factors including your technical skill level, budget, portability requirements and intended use case.
Casual users seeking occasional emergency charging will find solar power banks or USB solar chargers most suitable while outdoor enthusiasts requiring reliable daily charging might prefer charge controller systems with battery storage.
DIY enthusiasts can explore buck converters, boost converters or voltage regulator circuits for customized solutions that match specific solar panels and usage patterns.
Regardless of which method you choose, always verify output voltage with a multimeter before connecting your phone, use quality components to prevent fire hazards and remember that solar charging speed depends heavily on panel size, sunlight intensity and angle of exposure.
With the right setup, solar energy provides a sustainable, cost-effective way to keep your mobile devices powered anywhere the sun shines.
How to get the best from your solar setup
How to prevent frequent inverter damage when connected to grid